|
|
Asiasat2
Asiasat2 |
|
|
|
|
|
|
|
|
|
|
|
เทคนิคการติดตั้งจาน 5.5 ฟุต DUO THAICOM 2/3 & NSS 6เทคนิคการติดตั้งจาน 5.5 ฟุต DUO THAICOM 2/3 & NSS 6
THAICOM 2/3 C/KU & NSS 6 Ku

ขั้นตอนที่ 1 การติดตั้งจานแบบ Fix. รับดาวเทียม THAICOM 2/3

1. ตั้งเสาตั้งจานให้ได้ 90 องศา หรือให้ตั้งฉากกับพื้นโลกให้ดีที่สุด
2. ประกอบหน้าจานกับเสาตั้งจาน
3. ประกอบ LNB เข้ากับหน้าจาน ปรับ LNB ให้ได้ตามรูปหรือไกล้เคียง
4. ใช้เข็มทิศ แบบก้านอลูมิเนียม วัดทิศดาวเทียมไทยคม 240 องศา
- ตั้งเข็มทิศให้ตัวเลข 240 ทับกับเส้นสีแดง
- นำฉากอลูมิเนียมที่ติดเข็มทิศไปวางทาบที่คอจาน เหมือนภาพตัวอย่าง
- ปรับหน้าจานให้ เข็มทิศสีแดงดำ หมุนตรงกับทิศเหนือใต้ดังภาพ
5. ปรับมุมก้มเงยหาสัญญาณและปรับสัญญาณให้ได้แรงที่สุด ล๊อคน็อตทุกตัวให้แน่น
ขั้นตอนที่ 2 การทำ DUO THAICOM 2/3 & NNS 6
1. ประกอบ LNB Ku-Band Extra-Gain เข้ากับแขน DUO ตามรูป
2. ต่อสายตรงเข้าเครื่อง และลองเฉพาะดาวเทียม NSS 6 ก่อน
ตั้งค่า LNB เป็น Universal
3. ประกอบชุด DUO เข้ากับ LNB C-Band ตามรูป ปรับหาสัญญาณให้ได้
สัญญาณสูงที่สุด ล็อคน็อตให้แน่น เป็นอันว่าจบขั้นตอนการติดตั้งจาน DUO
4. ประกอบชุดสวิทตัดต่อสัญญาณ เข้ากับจาน แล้วปรับเครื่องให้ ระบบเครื่องเลือกดาวเทียมที่ต้องการให้ถูกต้องตามสวิทตัดต่อ ที่ต่อเอาไว้ เป็นอันว่าจบทุกขั้นตอนครับ


ในรูปนี้ ใช้ LNBF เป็นแบบ CKU
จะทำให้รับสัญญาณได้เพิ่มขึ้นอีก ทดสอบแล้วสัญญาณแรงมากครับ
นำเสนอโดย WWW.SIAMSATELLITE.COM
|
|
|
|
|
|
|
|
|
|
|
|
Introduction (now at Techtir Articles Satellite: How to align a dish )

Since all satellites for DTH (Direct To Home) TV are in geosationary orbit, they are positioned on an imaginary arc (now called the Clarke Belt in honour of Arthur C. Clarke) about 22,500 miles above the equator. This means a satellite dish always points upwards and in the direction of the equator i.e. generally southwards.
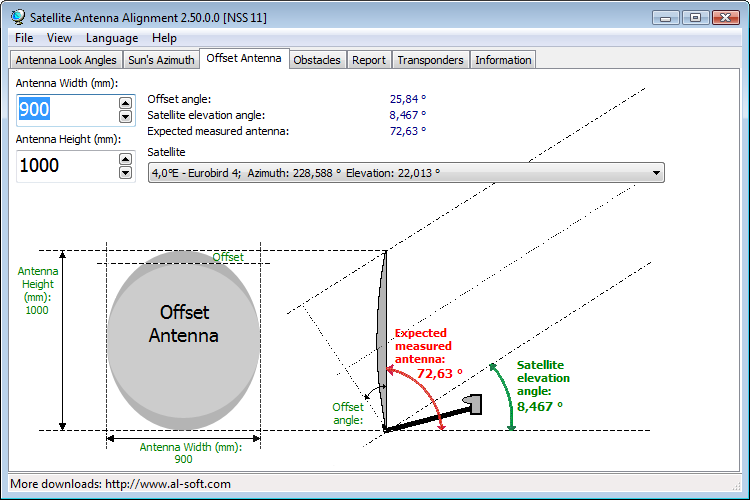
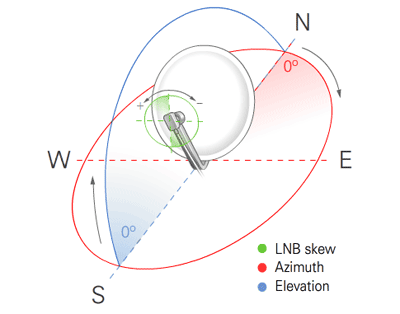
Terminology : Elevation and Azimuth The up and down angle is called 'Elevation'.

The East and West rotation angle is called 'Azimuth'.
Offset dishes : A word of warning An offset dish may appear to point downwards!

Offset dishes may appear to be pointed low towards the horizon, when in fact they are aiming at a much high elevation as shown in the above diagram.
Getting started If you've never aligned a dish before, it can be very frustrating, especially if you don't have a signal meter of some sort. You may well end up thinking the receiver is faulty. Digital channels are either 'on' or 'off' and do not fade in or out gradually like analogue signals, further adding to the difficulty. Waving a dish about in the deluded hope that you will somehow find the correct location without either setting the elevation angle or knowing the azimuth angle is a complete and utter waste of time. However, if you follow the steps outlined below you will succeed ... eventually!
1. Attach the F-connectors - Make sure that the cable and F-connectors are properly fitted as described clearly in the link. The inner core of the coax cable and the outer braid must never come in contact with each other.
2. Set the elevation angle - For the majority of novice satellite users, the satellite they wish to align to is the Astra2/Eurobird cluster at 28 degrees east. This is where Sky, BBC, ITV and C4 are transmitted from. For Ireland, the dish elevation for Astra2 is approximately 22 degrees.
Most offset dishes have an elevation scale on the mounting bracket which allows you to adjust the dish to the correct elevation.

Set this to 22 degrees and then tighten the nut.
For satellites other than Astra2, a list of approximate elevation angles is provided.
3. Tune your receiver - If you don't have a signal meter, you will have to use your receiver's on-screen meter. Firstly, make sure you are tuned to an active channel or transponder and that all the parameters are correct - Frequency 10.774GHz, Symbol Rate 22000, Polarisation Horizontal, (FEC Auto or 5/6) is suitable for the BBC channels on Astra2.
You may have to enter the Setup/Installation menu in order to have a constant display of the meter.

Note that the Signal Quality level is the important guide, not Signal Strength level!
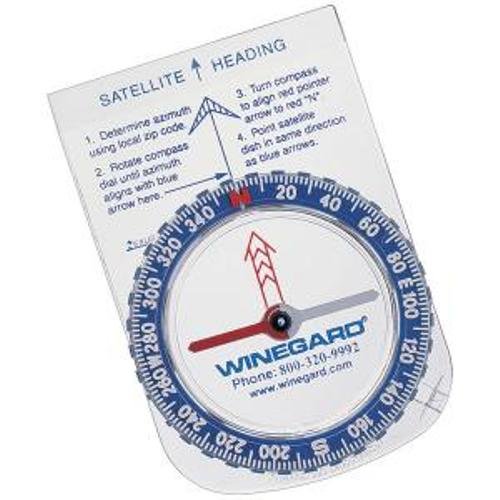
4. Aim the dish - A compass can be used to get a rough idea of where to aim the dish but remember to keep the compass away from the metal dish. The Dishpointer tool below is especially helpful.
<iframe name="dplite" frameborder="0" width="300" height="415" scrolling="no" src="http://www.dishpointer.com/servlet/dplite.php?showmap=true&showsatlist=true&showinfo=true&bgcol=FFFFFF&width=300&height=300&defaddress=Phoenix%20Park%2C%20Dublin&txtsize=10&txtcol=000000&language=en&satellite=0282"></iframe>
Alternatively you can use a calculated sunpass time for the satellite i.e. the time at which the sun's azimuth is the same as the satellite. A detailed explanation on how to locate a satellite using the position of the sun is provided.
5. Rotate the dish - Slowly move the dish east or west incrementally until you observe some activity on the receiver meter settings. If you rotate the dish too quickly, you will run past the satellite as there is a usually a small lag before the receiver quality meter reacts. When you do see activity on the meter, rotate the dish about that point until the level is at a maximum. Lock the dish into place.
6. Optimise the elevation - With the dish pointing in the right direction, readjust the elevation as per 2 until the quality is at a maximum
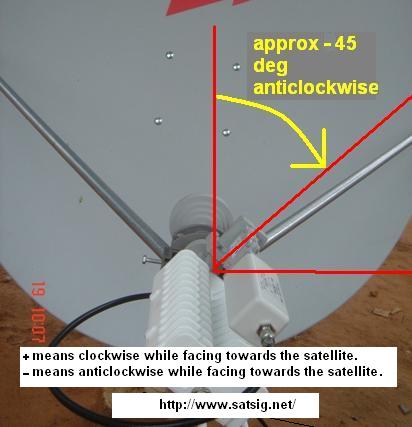
7. Set the skew angle - As you face the dish, rotate or twist the LNB clockwise for an easterly satellite or anticlockwise for a westerly satellite until the quality is again maximised. This can make a very significant improvement to the signal quality and should not be overlooked!

8. QED - Finished! If some channels are missing, then do a channel search to update the receiver's database.
Common Issues
1. When I perform a channel scan, I can only find German/Italian/foreign channels - if you find that mostly German or Italian channels are returned when you do a scan, then you are probably aligned to the wrong satellite. This will most likely be Astra 1 at 19 degrees east (or occasionally Hotbird at 13 degrees east). Therefore, the dish is aligned to a satellite which is both west of, and higher than, your target satellite at 28 degrees east. Note the current position of the dish using a marker or tipex, lower the dish by about 3 degrees and move it slowly east until you see activity again on the meter.
2. The signal meter is registering 80%, but all of the preprogrammed channels are still blank - again you are most likely aligned to the wrong satellite. The same frequencies are reused on different satellites across the arc e.g. on Astra 2D 28E, BBC One is transmitted on 10.818, V, 22000. But on Astra 1KR 19E, TVVI is also transmitted on 10.818, V, 22000. So if your receiver is tuned to BBC One, but your dish is aligned to Astra 1KR 19E, the signal level and quality meters will show readings of 80%, but the screen will remain blank. The solution is to align the dish to the correct satellite as per 1.
Additional Information
How to align a dish with a digibox.
Elevation calculations can be made online. (More technical calculation page )
Download the free dish calculator from Swedish Microwave AB.
For the more experienced user, Gorbtrack provides a wealth of information, including Sun-pass times and realtime tracking of inclined orbits.
Orbitron for tracking other man made objects, such as ISS, Iridium satellites. |
|
|
|
|
|
|
|
|
|
|
|
Post Last Edit by Sniper2 at 15-4-2010 12:06

 |
|
|
|
|
|
|
|
|
|
|
|
| Your KI KONECT - K2 PORTABLE DISH |
| | | 
[table=98%] | | KI KONECT - K2 PORTABLE DISH |
| Congratulations, you have joined thousands of people who enjoy Satellite TV and want to experience the fun and freedom of using the satellite TV anywhrer they go.
The KI KONNECT-K2 Portable Dish package has been developed from years of trial and refinement. We believe it will give you many hours of joy and satisfaction.
However, as with packages of this nature, improvements are always possivle and it will help us and other people like you, if you can feedback your idea and suggistions so we can continue to improve and make the portable dish package to more for you. Before we start experiencing the fun of portable Satellite TV, lets take some time to learn more about the package.
KI KONNECT -K2 COMPACT SET
The package come complete with the dish panel, the LNBF, a carrying bag, and the signal cables. You only have to bring along the IRD and do not forget the remote control of your IRD because you will need it to access functions required for setting up the dish antenna.
|
|  | The Portable Dish is a folding package allowing it to be very compact in the folded position. It also enables the user to carrying the folded package around using the carrying handle (1).
Once the package has been unfolded into the operation configuration (above in Fig. 2), it can be set on any flat surface. The Portable Dish stands on three support points, two (adjustable) support points are part of the Adjustable Stands (4) in fornt and one fixed at the back below the Azimuth Locking Knob. With this support configuration, the package can be adjusted to provide a level operating platform on virtually any surface. In order to point the dish at Thaicom satellite, the Portable Dish employs adjustments for azimuth and evelation as well as a compass to aid in locating the proper satellite. An experienced user can usually set up the dish within 10 minutes. | | [table=98%] |  | | Fig 1 Component of the Portable Dish |
|
|
[/td][/tr][tr][td=2,1][/td][/tr][tr][td=2,1]Installation of the KI KONNECT -K2 Portable Satellite Dish[/td][/tr][tr][td=2,1][/td][/tr][tr][td=2,1] | This section describes the steps to be taken when setting up the Portable Dish to receive Thaicom 2,3 satellite signal,
If you are in a hurry and want to quickly set it up to enjoy the TV program, then read section "How to set up the Portable Dish quickly" which describes the quick setup steps. If you have a little more time and want to understand the details of setting up the Portable Dish then read section "Detailed Discussion on How to Point the Dish at Thaicom 2&3 Satelites". | | | How to set up the Portable Dish quickly | | It is very easy to set up the Portable Dish so that you can receive the TV programs Just follow the following 1,2,3 steps. | 1. Setup the dish on a Level Ground
| | Unfold the front stands by unlatching the left and right latches be careful to support the dish reflector to prevent it from dropping forward. FIG 1,2 The two front stands can be unfolded and extended to the appropriate position depending on the actual terrain. | [/tble]| [table] |  | | FIG.1 UNFOLD THE LEFT (SHOWN) AND RIGHT LATCHES |
|  | | FIG.2 EXTEND THE STANDS TO AN APPROPRIATE POSITION |
| |  | FIG.3Y WHEN FOLDING THE LEGS AFTER USE, PLEASE MAKE SUTE THAT THE LEG
SEATS ITSELF INTO THE SEAT (A) CERTAIN PRESSURE MAYBE NECESSARY
TO ENSURE PROPER SEATING, ONCE STATED (B) IT IS QUIET EASY TO LATCH IT IN PLACE (C)
|
[/td][/tr][tr][td=2,1][/td][/tr][tr][td=2,1]| Unfold the dish reflector by lifting the back of the dish reflector. FIG. 3 |  | | FIG. 3 UNFOLD THE DISK REFLECTOR |
|
[/td][/tr][tr][td=2,1][/td][/tr][tr][td=2,1] | FIG.4 LIFT THE CATCH AND UNFOLD
THE ELEVATION ADJUSTMENT ARM |
| Unfold the elevation adjustment arm by unlocking the s
mall catch at the end of the elevation adjustment arm.
Swing the elevation adjustment arm out and
lock it in place by sliding the end through the slot and
latch in place. FIG.4 |
[/td][/tr][tr][td=2,1][/td][/tr][tr][td=2,1]| Retrieve the Feedboom (5) and the LNBF (3) and assemble them. FIG.5 |  | FIG.5 LOCK THE ELEVATION ADJUSTMENT
ARM IN PLACE WITH THE LATCH |
|
[/td][/tr][tr][td=2,1][/td][/tr][tr][td=2,1] | | FIG.6 ATTACT THE LNBF ON TO THE FREEDBOOM WITH THE LATCH |
| Then attach the Feedboom/LNBF assembly to the Frame (6) and lock in place. FIG. 6 |
[/td][/tr][tr][td=2,1][/td][/tr][tr][td=2,1]Next, set the dish package on a level ground. The more level you can set, the better off you will be, becuse all the helpful markings were done in the factory on a level surface.
The dish package stands on three points, the single support point at the back is fixed, the front two legs employ adjustable support points and can be adjusted for proper height (4) until the spirit level (bubble) centers itself on the center of the level.
Normally the surfaces of the street, deck or lawn are adequately level.
If the space you have looks obviously like a slope then you should adjust the stands (4) so that the dish does not lean too much to the left or right. FIG. 7 |  | | FIG.7 ATTACH THE FREEDBOOM ON TO THE FRAME AND LOCK IT IN PLACE |
|
[/td][/tr][tr][td=2,1][/td][/tr][tr][td=2,1] | | FIG.8 THE SPITIT LEVEL HELPS TO MAINTAIN LEVEL |
| You should also avoid areas that has a lot of steel or magnetic fields such as setting the dish too close to objects such as an automobile, steel structure, steel reinforcement in the floor as it Interferes with the operation of the compass and makes it diffcult to locate the satellite FIG. 8 |
[/td][/tr][tr][td=2,1][/=2,1]2. Find out where we are[/td][/tr][tr][td=2,1] | | FIG. 9 SET STARTING ELEVATION ANGLE (SEE TABLE 1) |
| Look in table I and find the closest city to your current location. Table I will tell you what level to set the Portable Dish stand. Set the scale on the dish stand to the appropriate value. For example, if you are in Bangkok, you should set the pointer to point at "10" on the scale. |
[/td][/tr][tr][td=2,1][/td][/tr][tr][td=2,1]3. Find the Satellite[/td][/tr][tr][td=2,1]Swing the Portable Dish to the right or left until the North indicator on the compass (on top of the LNBF) points to the "N" marking on the floating scale of the compass (FIG 10)
If you have not made any mistake, there should be a signal shown in the screen. Note the signal level on the screen, make fine adjustment (swing the dish slightly to the left then to the right) so that the signal level on the screen is at its maximum level.
Normally the signal level of over 180 is acceptable, however, we should be able to obtain 200-240 value easily, and 250 or above if you are really good!
| [table=98%] |  | | FIG. 10 FIND THE SATELLITE AZIMUTH ANGLE |
[/td][/tr][/tale][/td][/tr][tr][td=2,1][/td][/tr][tr][td=1,1,450][table=450][tr][td] [/td][/tr][tr][td]FIG. 11 PERFORM FINE ADJUSTMENTS AND SECURE THE SETTINGS[/td][/tr][/tabe][/td][/tr][/tabe][/td [/td][/tr][tr][td]FIG. 11 PERFORM FINE ADJUSTMENTS AND SECURE THE SETTINGS[/td][/tr][/tabe][/td][/tr][/tabe][/td |
|
|
|
|
|
|
|
|
|
|
|
Dish Azimuth (deg E relative to true north) Prime Focus 1.2m and above | |
|
|
|
|
|
|
|
|
|
|
|
|
satSystem...kalau nak tune Thaicom5 Ku...LNB sama arah mcm As*** (tak payah ubah dah). Pastu dish turunkan hingga ukuran sudut antara 60-62 darjah. Pastu halakan dish ke kanan sikit dari kedudukan asal As***.
Kalau ada blind scan senanglah...kalau takde blind san masukkan :
12272/H/30000
12313/H/30000
12355/H/30000
12399/H/30000
Selebihnya transponder UBC. Yang saya bagi tu kebanyakkannya channel FTA mcm DLTV (punya banyak...sampai 15 chnl)...Siam Sport (dulu scrambled...tapi skg dah bukak).
 |
|
|
|
|
|
|
|
|
|
|
|
Dear All
If you receiver have singal issued, such as Vertical OK Horizontal failed, both V/H failed or Signal strength up and down not stable. The IC attached in this message will show it.
IC : LM317
Price : MYR1.50
Note: this topic only for technical reference, if you have any source want to add (support with photo), welcome to share with everybody, but do not asking question here.
 |
|
|
|
|
|
|
|
|
|
|
|
Your Location Satellite Data Dish Setup Data
Latitude: 3.1770°
Longitude: 101.6816° Name: 91.5E Measat 3
Distance: 35921km Motor Latitude: 3.2°
Declination Angle: 0.6°
Dish Elevation: °
Elevation: 77.5°
Azimuth (true): 252.8°
Azimuth (magn.): 253.1°
LNB Skew [?]: 72.5° Dish Skew [?]: 90.0°
Your Location Satellite Data Dish Setup Data
Latitude: 3.1770°
Longitude: 101.6816° Name: 105.5E Asiasat 3S
Distance: 35820km Motor Latitude: 3.2°
Declination Angle: 0.6°
Dish Elevation: °
Elevation: 84.1°
Azimuth (true): 129.7°
Azimuth (magn.): 130.0°
LNB Skew [?]: -50.2° Dish Skew [?]: 90.0°
Your Location Satellite Data Dish Setup Data
Latitude: 3.1770°
Longitude: 101.6816° Name: 88.0E ST-1
Distance: 36015km Motor Latitude: 3.2°
Declination Angle: 0.6°
Dish Elevation: °
Elevation: 73.5°
Azimuth (true): 257.1°
Azimuth (magn.): 257.4°
LNB Skew [?]: 76.8° Dish Skew [?]: 90.0°
Your Location Satellite Data Dish Setup Data
Latitude: 3.1770°
Longitude: 101.6816° Name: 108.0E NSS 11 | Telkom 1
Distance: 35849km Motor Latitude: 3.2°
Declination Angle: 0.6°
Dish Elevation: °
Elevation: 81.7°
Azimuth (true): 116.6°
Azimuth (magn.): 116.9°
LNB Skew [?]: -63.2° Dish Skew [?]: 90.0°
Your Location Satellite Data Dish Setup Data
Latitude: 3.1770°
Longitude: 101.6816° Name: 78.5E Thaicom 2, 5
Distance: 36403km Motor Latitude: 3.2°
Declination Angle: 0.6°
Dish Elevation: °
Elevation: 62.6°
Azimuth (true): 262.6°
Azimuth (magn.): 262.9°
LNB Skew [?]: 82.0° Dish Skew [?]: 90.0° |
|
|
|
|
|
|
|
|
|
|
|
Post Last Edit by Sniper2 at 15-4-2010 14:02
 |
|
|
|
|
|
|
|
|
|
|
|
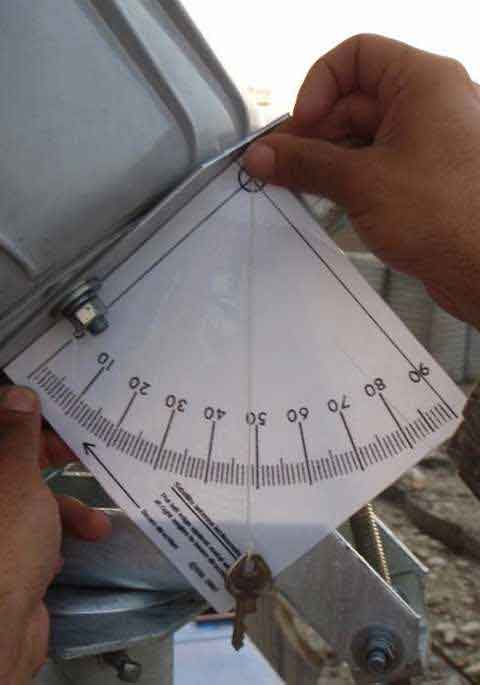
| How to make an inclinometer |
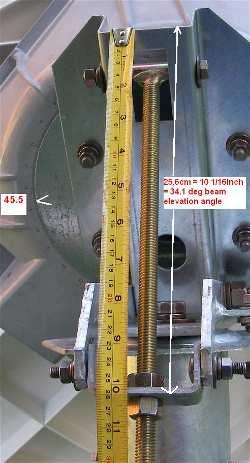
You can easily make you own inclinometer, for satellite dish elevation adjustment, which will more accurate than most cheap ones you can buy.
Instructions on how to make an inclinometer:You need to print out the image below and stick it onto a piece of cardboard. Make a pinhole at the apex (centre of the small circle, near top left corner) and insert a length of strong sewing thread. Behind the card use sticky tape to secure the thread. At the front, attach a small weight, such as a 15mm or 1/2 inch metal nut, to the end of the thread, approx 20 cm or 8 inches long, so the weight dangles down past the lower edge of the card.
How to print the square image: Put your mouse on the image above, and do right mouse click, then select "Print picture". After you have printed, check by measuring each way that the image has printed as an exact square.
Your printer will inset a left white margin. Don't worry, if you put the paper into the printer feeder straight then the picture will still be accurately upright and parallel to the left side of the paper. When attaching to a card make sure the left edge of the paper goes exactly to the left edge of the card so the left margin gap is parallel down the left side.
How to use your inclinometer:
To use it, simply place the left edge of the card against the surface you are trying to measure. See installing a Prodelin VSAT satellite dish for a picture of the inclinometer in use. Always think about the angle and ask yourself if the meaning of the numbers make sense. Lowering the beam should reduce the elevation angle, down to zero at the horizon. Straight up is 90 deg. If the scale reads backwards in your case, don't worry; just count the degrees from the other end.
In the case of axi-symmetric, circular dishes, with 3 or 4 equal length struts supporting the LNB on the exact centre line, then the beam is at right angles to the central backing structure behind the reflector.
In the case of offset fed antennas, where there is a main feed support arm, normally at the bottom of the dish, and two shorter side support struts there is an offset angle. When the front face of the dish is upright the beam will have an elevation angle of perhaps 22.5 deg, 25 deg etc according to the specific manufacturer. To help in these cases, the manufacturer often makes a part of the metal structure so it is at right angles to the beam direction. This metal part may be the lower part of the spine behind the dish or form the rear part on a sloping boss fixture behind the middle of the dish. If there is scale you don't need this inclinometer ! |
|
|
|
|
|
|
|
|
|
|
|


CH-3: 3965 H 4550
CH-5: 3906 H 6240
CH-7: 3765 H 5900
CH-9: 3887 H 15625
NBT: 4105 H 4688
Thai PBS: 4145 H 4815
DMC: 3600 H 26667
SBT Luangtabua: 3803 H 1445
SBB TV: 3544 V 30000
TV MUSLIM: 3544 V 30000
Gang Cartoon: 4158 V 1852
Mix Theater: 3585 V 26667
Mongkol Channel: 3544 V 30000
Major Channel: 3585 V 26667
Variety Channel: 3585 V 26667
Cham Channel: 3912 V 1852
Nation Channel: 3960 V 30000
TV GlobalNetwork: 3600 H 26667
TV Pool Channel: 3544 V 30000
Bangkok Today: 3544 V 30000
MVTV 5: 3585 V 26667
Star Channel: 3585 V 26667
One Channel: 3458 V 2222
Voice TV: 3544 V 30000
Mahadthai : 3987 H 2025
People Channel : 3511 H 13333
ICT Network: 3509 V 3333
News Ch: 3585 V 26667
Green Channel: 3544 V 30000
Bang Channel: 3544 V 30000
You Channel: 3960 V 30000
Fan TV: 3544 V 30000
Sabaidee TV 3960 V 30000
Hit Station: 3585 V 26667
P5 TV: 3585 V 26667
EARTH: 3600 H 26667
PSI Channel 4155 V 2222
ASEAN TV: 3887 H 15625
ACTS Channel: 3544 V 30000
Football Plus: 3600 H 26667
S Channel: 3544 V 30000
My TV: 3585 V 26667
Ace Channel: 3600 H 26667
MB Channel: 3915 V 2222
NEO TV: 3544 V 30000
PEAK TV: 3600 H 26667
Oho Channel: 3960 V 30000
Jewelry Channel: 3544 V 30000
H Plus Channel: 3585 V 26667
Doodee Channel: 3505 V 1852
Dara Channel: 3585 V 26667
Super Cheng: 3544 V 30000
i Channel: 4016 H 2300
in TV: 3545 V 30000
TEN TV: 4016 H 2300
Ai-Net Channel: 3585 V 26667 |
|
|
|
|
|
|
|
|
|
| |
|


 Post time 15-4-2010 10:55 AM


 olarizeโดยหันขั้ว F-Type ของLNBFไปที่ตำแหน่ง 8 นาฬิกา ตามรูป