|
|
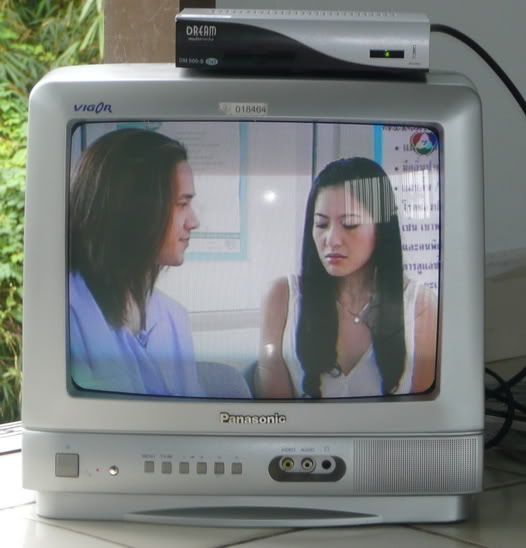
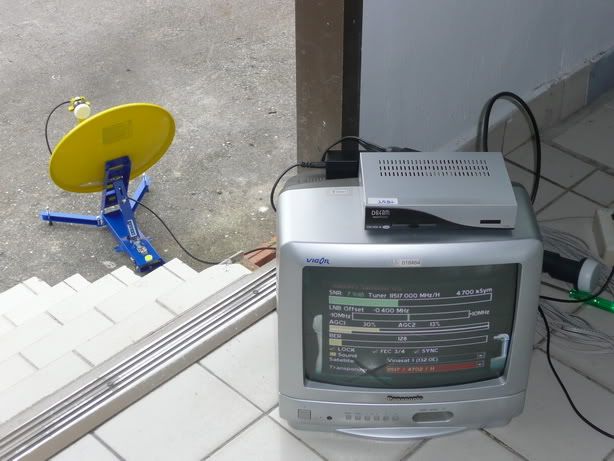
intelsat 7/10 (multichoice) indoor 1.8m cband dish. Rm 202, Valleyview Hotel. Quality 36%

 |
|
|
|
|
|
|
|
|
|
|
|
Introducing SatHunter
Calculate angles of satellite dishes. SatHunter is a program for calculating the orientation of a satellite antenna.
SatHunter contains all the necessary information for adjusting the satellite antenna to the selected satellite. The adjustment is made with the help of available tools (a compass or a protractor, a plumb, a tape measure) and requires neither expensive equipment nor deep knowledge about satellite television.
SatHunter � An easy-to-use tool that will help you to align a satellite system and easily find the signal from a satellite. The program has many features, such as: Sat azimuth, Sat elevation, Transponder list, DVB Tuner and more.
SatHunter - Find TV satellites in the sky.
FeaturesMain features:
- Calculates the azimuth and elevation angle.
- Provides a list of satellite transponders for setting up the receiver.
- Calculates the solar azimuth angle.
- Calculates the time when the satellite and solar azimuth angles coincide.
- Calculates the antenna offset angle and tilt.
- Points the antenna using the azimuth with the help of the sun and a protractor.
- Points the antenna using the azimuth with the help of a compass.
- Adjusts the elevation angle with the help of a tape measure and a plumb.
- Detects coordinates by IP or by using a list of cities.
- Detects time using an exact time server.
- Scans transponders with a SkyStar DVB card.
- View signal level and quality with sound signalization.
- Free for private home use.
How-To Guide How to point the antenna to the satellite with SatHunter
Follow these step-by-step instructions:
1. Preparatory Operations
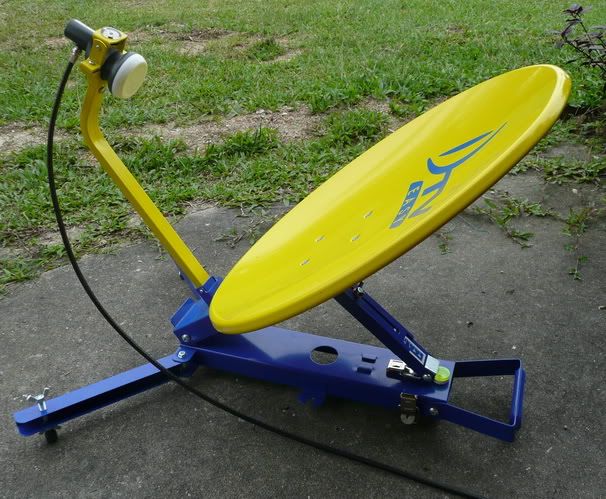
Assemble the satellite antenna according to the manual. Select the place for the antenna. Mount it facing south (for the Northern hemisphere).
There must not be any obstacles (buildings, trees, etc.) between the antenna and the selected satellite.
The bracket the antenna is mounted on must be strictly vertical (use a level):

Mount the antenna on the bracket, but do not tighten the adjusting bolts too much, because the antenna must move in two planes.

To point the antenna to the satellite, you should position it according to the azimuth and the elevation angle.
2. Software Configuration
Before you start working with SatHunter, you should configure it:

Time and date are automatically adjusted when you start the program.
At any moment, you can set the software time to the local computer time (using the Get local time button) or get it from an exact time server (using the Get SNTP Time button).
Enter your local geographic coordinates.
If you do not know your coordinates, select the nearest city from the city list or click the "Autodetect" button, and SatHunter will try to detect your location automatically.
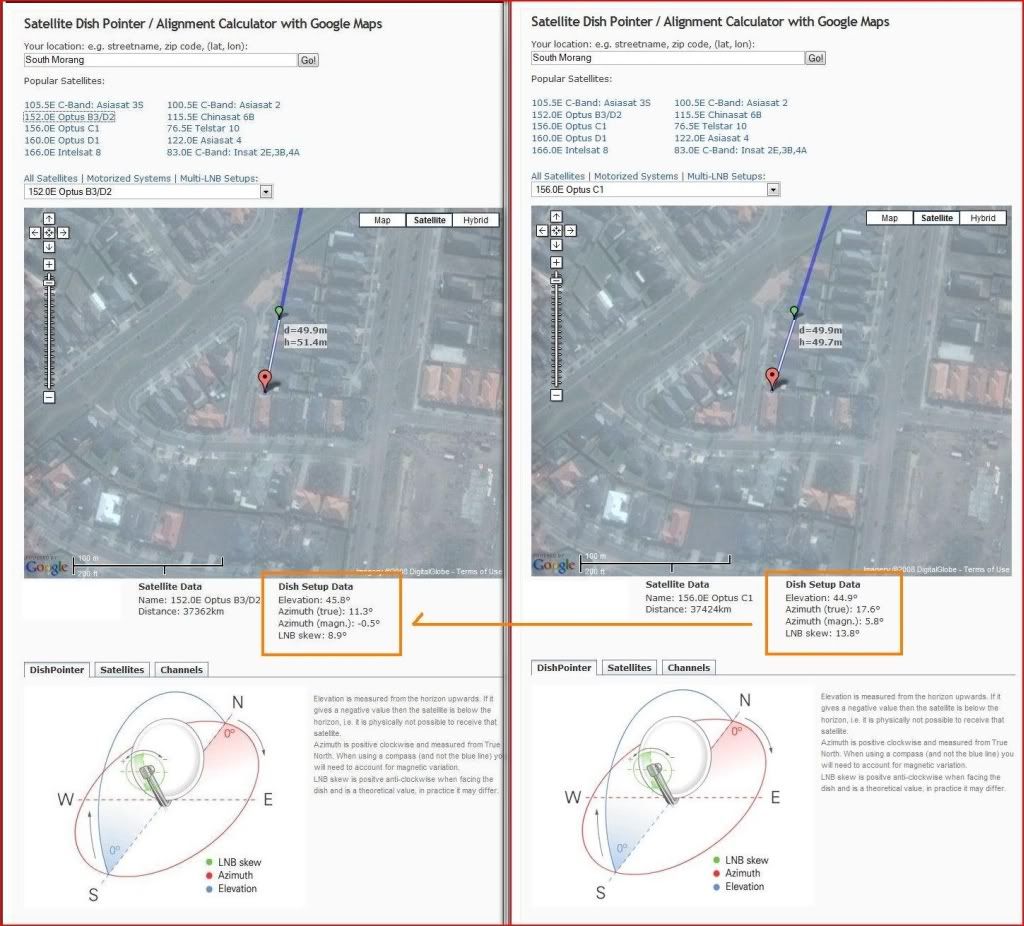
From the list provided, select the satellite to which you want to point the antenna:

Elevation
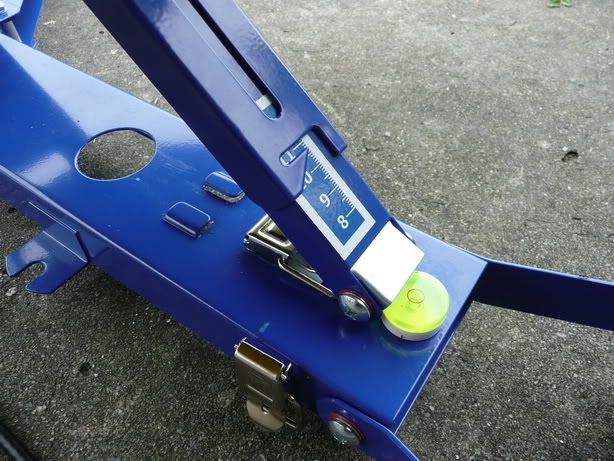
3. Adjusting the Antenna Elevation Angle
3.1 If Your Antenna Has a Scale
Find the elevation angle of your satellite in the table:
� 
Adjust the angle on the antenna:

3.2 Using a Plumb

Specify the width (W) and height (H) of the antenna.
Use the plumb and a ruler to specify the X length.
Fasten the antenna vertically.
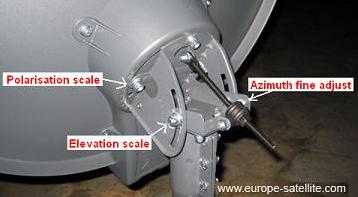
Azimuth
4 Pointing the Antenna by the Azimuth
4.1 With the Help of a Compass

Remove the antenna from the bracket. Mount the compass on the bracket and position it southwards by rotating it (180). Mark the necessary azimuth (122 in this example) on the bracket with an indelible marker.

Mount the antenna on the bracket and orient it towards the necessary azimuth.
Note that you have to take into account your local magnetic declination in this case.
4.2 With the Help of the Sun
Use the table below to see the time when the satellite azimuth and the solar azimuth coincide:

Orient the antenna towards the sun at that exact time (you can use a matchstick shadow):

Match the shadow and the line along the LNB bracket. |
|
|
|
|
|
|
|
|
|
|
|
4.3 With the Help of the Sun and a Protractor
Find the difference between the solar azimuth and the satellite azimuth for the desired time.
The shadow from the sun will point to this angle in case of exact orientation towards the satellite.

Print the protractor. (You can use the compass dial as a protractor.)

Attach the protractor to the LNB bracket (180 forward), push a match or a toothpick through its center:

Match the shadow with the previously detected corner by revolving the antenna on its axis.
You can see the table of solar azimuths for the current day. You can print the table and use its data during the mounting process.
5 LNB Rotation
Rotate the LNB in its housing to the correct angle and direction:


6 Tuning
6.1 Setting the Tuner
Connect the antenna LNB to the receiver and the receiver to the TV set according to the receiver manual.
Enter the transponder properties into the receiver (frequency, symbol rate, polarization, forward error correction):

You can find the list of transponders for the selected satellite and their properties in the Tuner section of SatHunter:

To get more detailed information about transponders, click the �View�� by the corresponding satellite.

6.2 Tuning with a S��Star DVB card:
If there is a DVB-S card installed on your computer, you can set up antenna precisely using the Tuner section.
Use the list to select the necessary transponder or enter its properties manually, then click the "Set Tuner" button.

7. Fine-Tuning
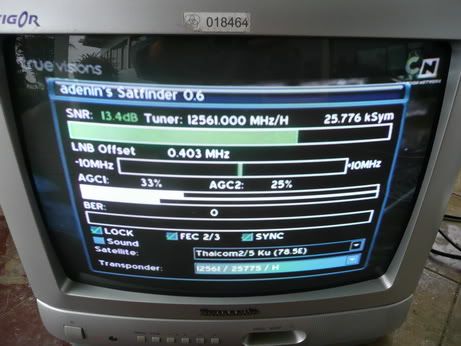
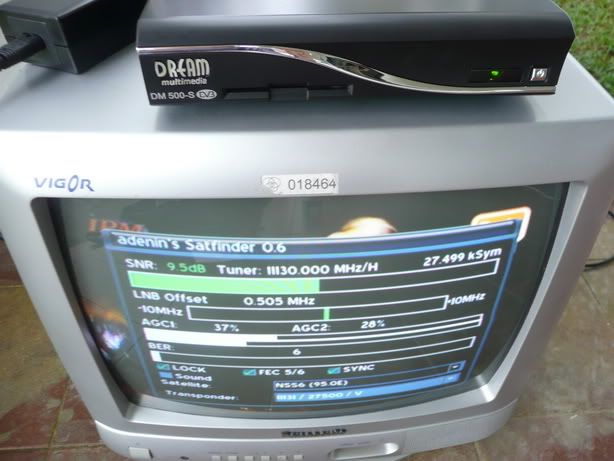
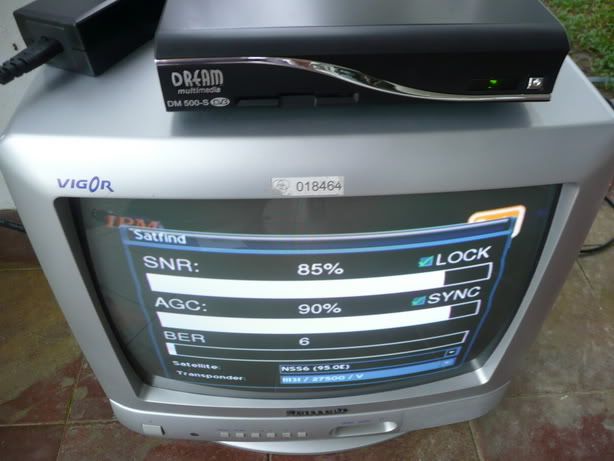
If you have done everything correctly and accurately to this point, you should see a quality bar on the connected receiver or in SatHunter:


If this is not the case, try moving the antenna slowly vertically or horizontally in search of the satellite beam.

Make sure you try to get the maximum quality level.
Set up the receiver according to its manual.
Working with SatHunter SatHunter contains all the necessary information for adjusting the satellite antenna to the selected satellite. The adjustment is made with the help of available tools (a compass or a protractor, a plumb, a tape measure) and requires neither expensive equipment nor deep knowledge about satellite television.
To start working with SatHunter:
1. Enter your coordinates.
2. Select the satellite you want to point the antenna to in the list.
You will see all the necessary calculations in the lower pane of the program window.

Quick start
1. Enter your geographic coordinates, date, and time.

2. Select the satellite you need.

3. Enter the size of your antenna.

4. Find the calculation results in SatHunter�s lower pane.
Sat azimuth: Orientation towards the satellite.
X: The offset of the antenna edge from the plumb.
R: LNB rotation in its housing.

 |
|
|
|
|
|
|
|
|
|
|
|


เป็นแนวเอียงของขั่วรับสัญญาณ (มองเข้าหาหน้าจาน)LNB หรือ LNBF ซึ่งมีผลต่อการรับสัณญาณ ถ้าหันไม่ถูกต้อง อาจจะรับสัญญารไม่ได้เลย |
|
|
|
|
|
|
|
|
|
|
|
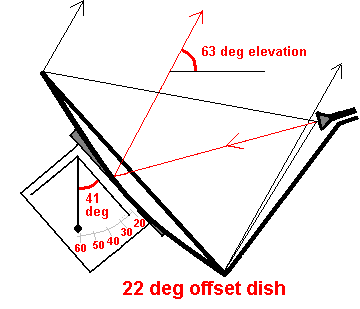
: : วัดมุมชดเชย : : [size=-7]วัดค่ามุมชดเชยทั้งด้านหน้า และหลังให้เท่ากัน ถ้าไม่เท่ากันให้ปรับ น็อตมุมชดเชย (ถ้าเป็นจานของ PSI จะมีการปรับส่วนนี้ให้ เรียบร้อยจากโรงงานแล้ว จึงไม่จำเป็นต้องปรับอีกต่อไป)
แล้วนำ angle มาติดที่คอจาน (ดังรูป) แล้วปรับน็อตที่มุมก้มเงยของจาน (อยู่ติดกับเม้าท์ ที่มีรูสไลด์) ให้ได้มุมเงยแต่ละจังหวัด ดูได้จากตาราง ของดาวเทียม)[size=-7]
 
: : ปรับหน้าจาน : : ตั้งแกนรองรับให้หน้าจานหมุนไปทางทิศใต้ (โดยใช้เข็มทิศหาทิศ ซึ่งควรขีด เส้นไว้บนพื้นเป็นรูปกากบาท แล้วให้แนวก้านจานเบอร์ 6-12 ขนานไปกับแนวเหนือได้) จากนั้นให้ทำการ ล็อคน็อตประกับรัดคอแน่นพอประมาณ เพราะว่าจะต้องหมุนปรับละเอียดอีกครั้ง เพื่อหาภาพที่ชัดเจนที่สุด
|
|
|
|
|
|
|
|
|
|
|
|
Support
Dish Installation |  | This section describes how to install a 30" fixed dish. | To receive satellite broadcast signals, your satellite dish needs to be positioned correctly. You can do this yourself. Determining the Elevation and Azimuth
The satellites are "parked" approximately 22,300 miles above the equator. In reality, the satellites travel from west to east, but to us on Earth they appear stationary because they match the exact speed of the Earth’s rotation. (This is a geostationary orbit.) If you stand up now, turn towards the southern hemisphere, and tilt your head up to the heavens, you’ll be looking in the general direction of our satellite To calculate the azimuth and elevation angle for your location, you may click on this Azimuth/Elevation link. We implemented this software on our website and the link will now always work. You ou can download this small look.exe file from this website which can run on your PC. | | | | Azimuth | Elevation | Elevation Reading | Now that you have your azimuth and elevation coordinates, what do you do with them?  First, survey the site to ensure an unobstructed view in the direction of the satellite. To receive broadcast signals, your satellite dish needs to be positioned correctly. Mount your satellite dish so that the base fits flush with the mounting surface (level if mounted on a flat beam or roof, or on an angle to match the pitch of your roofline). When you have securely mounted your satellite dish, adjust your dish so that the dish mast is plumb, that is, exactly perpendicular to level - this is best achieved using a carpenter's level. With your dish now mounted and properly set, you are now ready to aim your dish toward the satellites. First, survey the site to ensure an unobstructed view in the direction of the satellite. To receive broadcast signals, your satellite dish needs to be positioned correctly. Mount your satellite dish so that the base fits flush with the mounting surface (level if mounted on a flat beam or roof, or on an angle to match the pitch of your roofline). When you have securely mounted your satellite dish, adjust your dish so that the dish mast is plumb, that is, exactly perpendicular to level - this is best achieved using a carpenter's level. With your dish now mounted and properly set, you are now ready to aim your dish toward the satellites.
To set the dish to point up to the satellites, you’ll first need to set the elevation. Then you’ll point the dish in the proper left-to-right position, to set the azimuth. You’ll need to refer to the installation manual for your system for detailed instructions, but here’s the short course.
Setting the Elevation (UP), (DOWN)
You can set the proper elevation after the dish is securely mounted. First, loosen the nuts securing the two elevation bolts so that the dish easily moves up and down. Line up the elevation indicator with the tick mark corresponding to your elevation number. Then tighten the bolts. You may need to readjust the elevation up or down slightly to get the best signal. See figure on top. Setting the Azimuth (LEFT), (RIGHT)
Loosen the azimuth nuts on the LNB arm enough that the dish can be turned smoothly with little pressure. Set the azimuth by moving the dish left and right. Point the dish in the general direction of the satellite, in the southern hemisphere. By using a compass you can better pinpoint the direction with your azimuth number to correspond with the degrees on your compass. See figure on top.
Acquiring the Signal
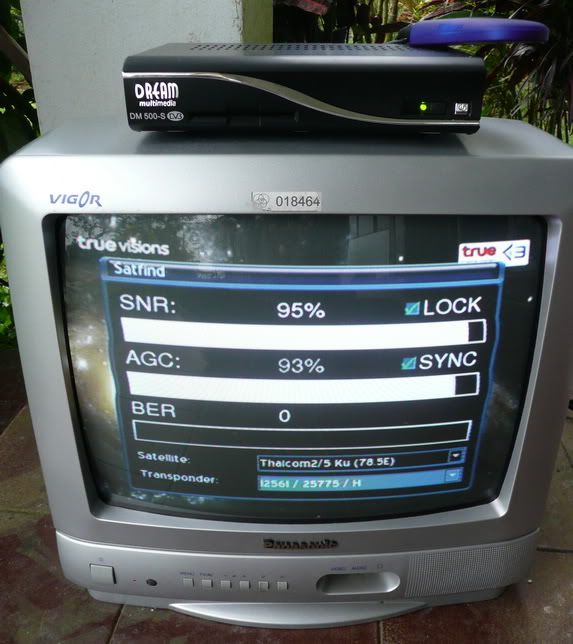
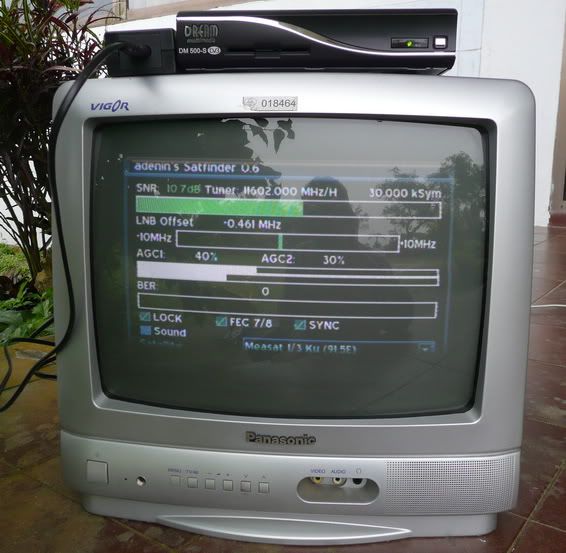
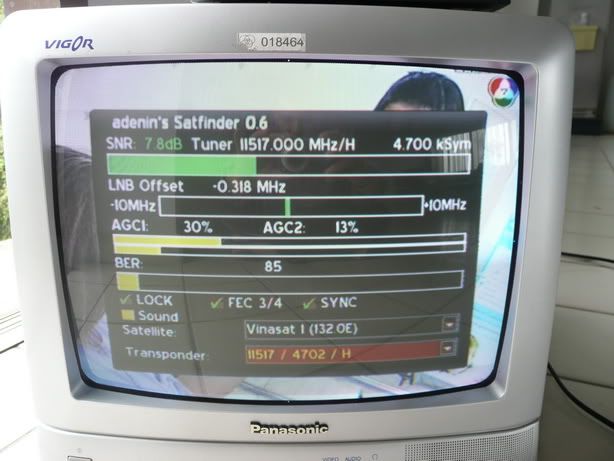
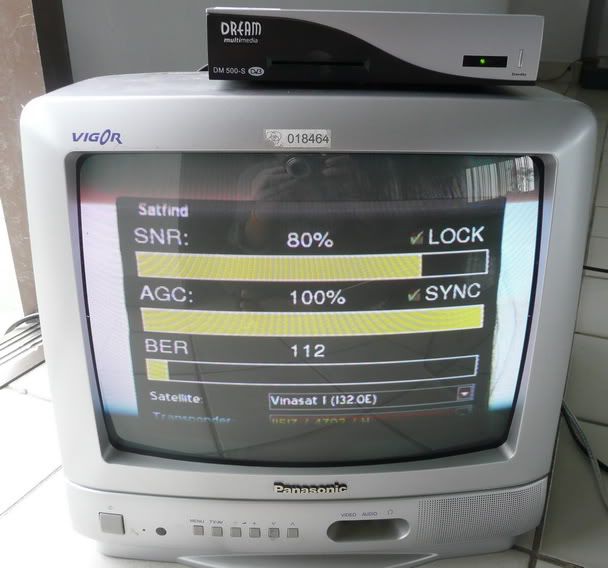
Now your dish will be in position to lock in on the satellite signal. You’ll need to 1) have your digital receiver connected to your television, with both turned on, and 2) have your antenna LNB to receiver cables connected, and 3) be viewing your Setup Antenna/Signal Strength display from your digital receiver's on-screen menu to measure the signal strength accurately. To view the signal strength and quality (Satcruiser receivers Telstar 5 for example) press Menu, Installation, TP Configuration, select Telstar 5 and frequency 12152 or frequency 11898.
Ask a helper to watch the Signal Strength screen for indications you are receiving the signal, the upper meter is the signal strength, the lower meter is the signal quality. Please note that you will receive the signal ONLY when there is a signal on the lower meter (signal quality). Stand behind the dish, and holding its outer edges, slowly turn it a little to the right to adjust the azimuth. Pause a few seconds, giving the receiver enough time to lock in on the satellite signal. Continue turning the dish in this way until you have acquired the signal or until you have rotated the dish approximately 15 degrees from the starting point. If you haven’t detected a signal yet, return to the starting point and move the dish to the left again. If you don’t acquire the signal after rotating the dish approximately 15 degrees to either side of the calculated azimuth angle, loosen the elevation bolts and tilt the dish upward so the elevation indicator moves halfway from the current tick mark to the next mark. Then tighten the elevation bolts. If necessary, continue changing the elevation in half-tick-mark increments until you receive the signal. After tilting the dish upwards three tick marks beyond the original tick mark, return it to the original tick mark and then tilt it down a half tick mark. Keep repeating this until you receive the signal. If the Signal still eludes you, check: Check to make sure that the mount is 100% level. The portion that the dish mounts on must be straight up to the sky level. Otherwise you will not be able to find the signal That nothing--a tree, for example--obstructs the signal that the cables are connected properly to the receiver. That you have the correct azimuth and elevation coordinates Fine Tuning
Now that you have received the satellite signal, it is important to fine tune the dish pointing to make sure you have the maximum possible signal strength. Maximizing the signal is important, in that, it reduces "rain fade" during inclement weather. Loosen the elevation bolts, then gently continue turning the dish a little in the same direction you were turning it when you began to receive the satellite signal. Pause for a few seconds each time after moving the dish. Turn the dish in this way until the signal quality strength reaches its highest reading and then begins to fall. Then slowly turn the dish the opposite way until you again receive the highest reading on the Signal Strength screen. Important: The Signal Strength reading does not need to be "100." Lock in on the highest possible signal. Tighten the azimuth bolts. Loosen the elevation bolts. Slowly tilt the dish up and down to improve the Signal Strength reading. When you are satisfied that you have the strongest signal, tighten the elevation bolts. |
|
|
|
|
|
|
|
|
|
|
| |
|


 Post time 15-4-2010 03:20 PM